so before i started modelling our character for our degree show film"Aero-sault" i decided to practice my modelling and texturing in Maya before i cracked on. Also so i had something to put into my showreel as well. Below is my progression of my self portrait project and will show you the journey i took into creating my final image.
 |
| I start out by blocking out the head |
 |
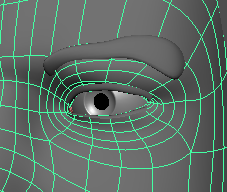
| I then begin to block in the eye |
 |
| Blocking out nose |
 |
| adding in more edge loops to help with more precise detail on nose |
 |
| adding in more edge loops to help with more precise detail on mouth |
 |
| more detailing on the mouth |
 |
| I used CV curves to lay out shape of ear then extruded along curves |
 |
| I then had to look at how i was going to connect the ear to the head |
 |
| after merging some edges i was left with the equal sides to attach to the head |
 |
| I then began to look at it smoothed to see what changes it needed |
 |
| I then added the eyes which i had made earlier but changed the colour to match mine. |
 |
| I then started to look at what needed done to make it more like myself |
 |
| I then copied the other side across to help me amend the model to look like myself |
 |
| I made some ammendments and added in a rough shape for the eyebrows |
 |
| I then added a rough hair shape |
 |
| a close up of the eye area with eye lash shape. |
 |
| UV Mapping of the face |
 |
| Texture for UV map |
 |
| The texture applied to the model |
 |
| Epidermal layer |
 |
| specular layer |
 |
| Subdermal Layer |
 |
| Specular bump |
 |
| Bump map |
Now that i had the shaders all set up it was time for the Hair. I started to try and use the actual hair option in Maya but there was difficulty in getting a realistic look plus trying to match my short spiky hair. So after all consideration i ended up using Maya fur. The Maya fur worked really well and was a lot easier to get a realistic look and also very close to my own hair.
 |
| Doesn't look much but this is what Maya fur is lie before rendering. |
So after a long brawl with maya this is finally what my end result is. Im finished with this model for now but as i gain more experience i feel i shall come back to it and fix things I'm not happy with. I rendered these images using Imaged based lighting and also a mixture of spot lights and directional
lights.
 |
| skin texture |
 |
| eye ball example |
 |
| Hair texture |
 |
| Hair and face texture |
 |
| Front face 1 |
 |
| front face 2 |
Any questions or comments please feel free
DMC


